Scenario:
You are running a service that is dinamically resolved through a geohost (ie. myservice.gslb.info) and you need to set up security and DNS resolution rules to:
- respond “NXDOMAIN” (FQDN not found) to all Internet clients running malware that try to resolve myservice.gslb.info
- always allow (whitelist) DNS resolution from your own public IP subnet (ie. 1.1.1.0/24). DNS resolution will take place according to the geohost configuration (to set up your geohost please refer to one of our howtos listed here below)
- respond with CNAME “www.google.com” to queries coming from subnet 6.5.4.0/28
How to configure it:
Log on to GSLB.me using your credentials or register if you still don’t have an account

If we don’t have a geohost, it can be created by following one of our howtos. Our example geohost will be named myservice.gslb.info
- Geographical proximity-based DNS resolution
- Active-standby DNS-based balancing (disaster recovery)
- Load balancing between two datacenters
- Configuring and using georouting for smart geographical-based resolution
Once the geohost is configured and working as expected, a firewall policy can be created and applied to it. In the web configuration interface the geohost is displayed in the left panel, and from the dashboard on the right the “Firewall policies” icon can be clicked to display the firewall configuration section.

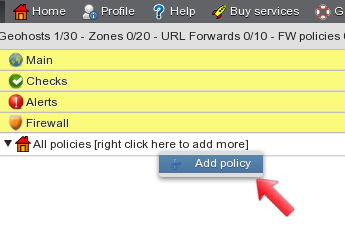
Once the Firewall section is displayed, right click on the “All policies” label to open the menu and select “Add policy”. This starts creation of a new firewall policy.
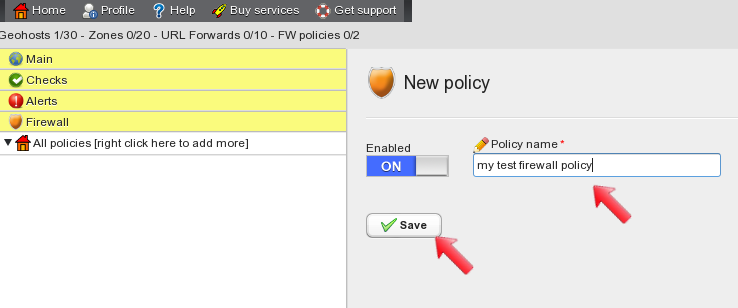
 In the main configuration panel type a descriptive name for the firewall policy, make sure it is enabled and click on “save”.
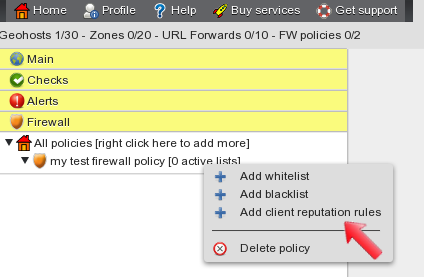
After saving the new policy, it is displayed in the tree on the left side of the screen. Right-click on the name of the newly created policy and select “Add client reputation rules” from the menu. This leads to the client reputation configuration panel.
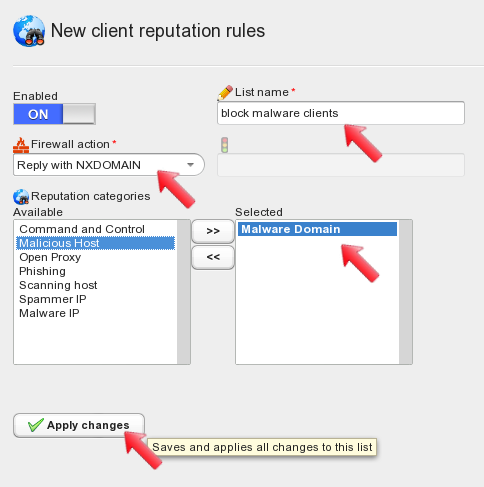
The client reputation panel allows you to configure rules to handle invasive/bad clients and to define the kind of DNS reply they will get when trying to resolve the geohost FQDN. Type a descriptive name for the client reputation rule, select the firewall action “Reply with NXDOMAIN” and move the “Malware Domain” category in the “selected” column using the “>>” button. When done, apply changes by clicking on the button.
When changes are applied, the newly created client reputation rule is displayed on the left panel. Notice that the “my test firewall policy” has no active lists: later on we will need to define which rule lists will be effectively used as part of our firewall policy.
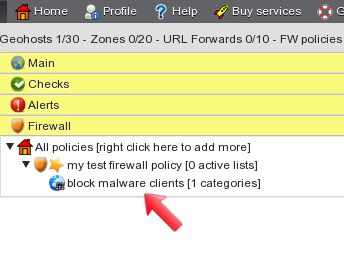
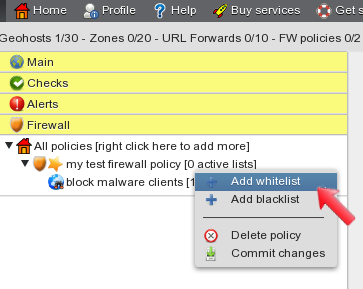
Let’s add a whitelist now: right click on the policy name and select “Add whitelist” from the menu. This brings up the whitelist configuration panel.
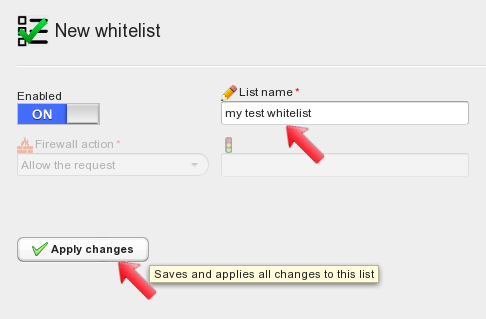
In the main configuration panel type a descriptive name for the whitelist, make sure it is enabled and apply changes.
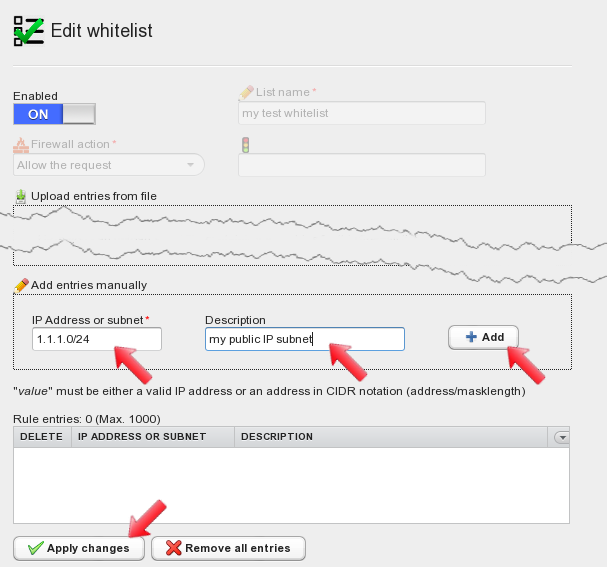
After applying changes, click on the whitelist name in the panel on the left side of the screen, this brings up the whitelist configuration.
Whitelist entries can be either IP addresses or whole subnets using the ip/netmask notation. Entries can be added manually and can include a description, or they can be imported from plaintext files. For the scope of this howto add a sample 1.1.1.0/24 subnet to the whitelist, together with its description, and then click on “Add” to save the entry. After adding the entry apply changes by clicking on the “Apply changes” button.
After applying changes to the whitelist, it is displayed on the left hand side of the screen. Right-click on the policy name to open the menu and select “Add blacklist”.
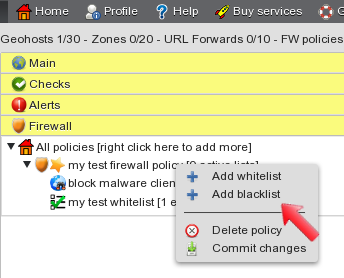
The blacklist configuration panel allows you to configure what reply to send to unwanted clients that try to resolve your FQDN. Type a descriptive name for the blacklist and select the firewall action “Reply with a CNAME”.
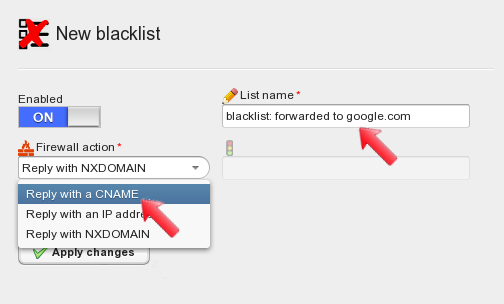
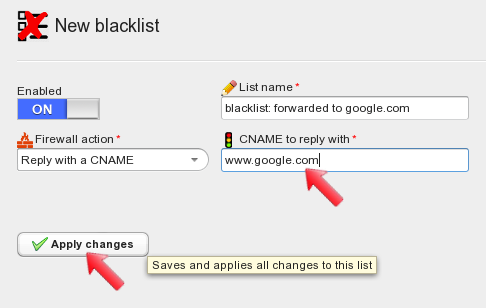
Select “Reply with a CNAME” as the firewall action, type the CNAME you want blacklisted clients to get as a reply, let’s use www.google.com. When done, apply changes.
After applying changes, the blacklist is displayed on the left hand side of the screen. Left-click it to open its configuration panel again. Now blacklist entries can be added, together with their optional description. Click the “Add” button to add the entry, and then click on “Apply changes” to commit the blacklist.
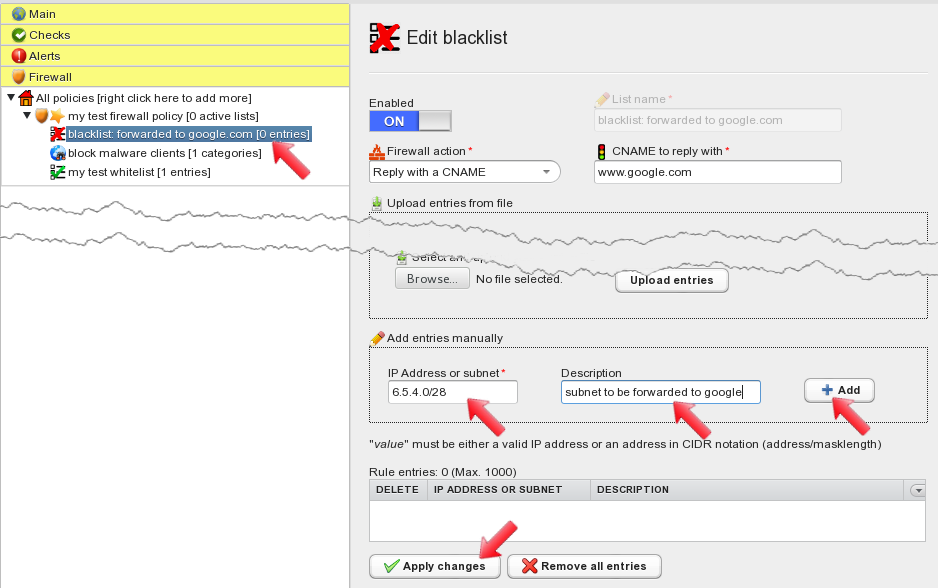
All three lists are now configured and displayed under the firewall policy.
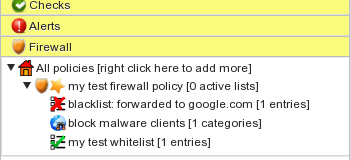
Now we need to select what lists we want to run in the firewall policy, and define their matching order. To do so, click on the firewall policy name. This brings you to the policy configuration panel. Here we can select available lists and make them active in the current firewall policy. Selected lists can be ordered using the “up” and “down” buttons. The “Save” button applies changes.
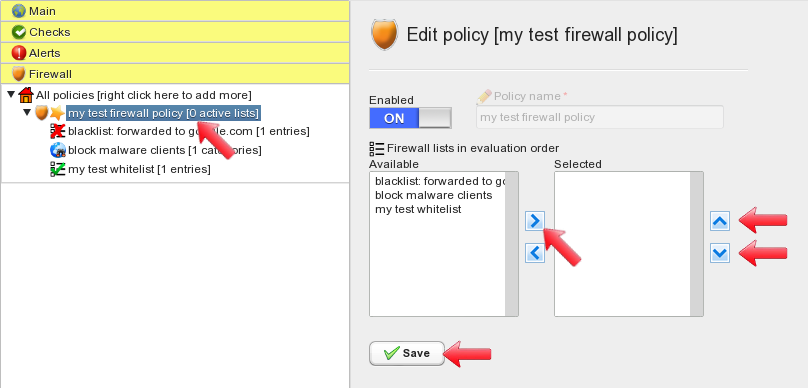
Select the “block malware clients” as the first list, then “my test whitelist” followed by “blacklist: forwarded to google.com”. This sets up the order firewall rules will be processed. Click on save when done.
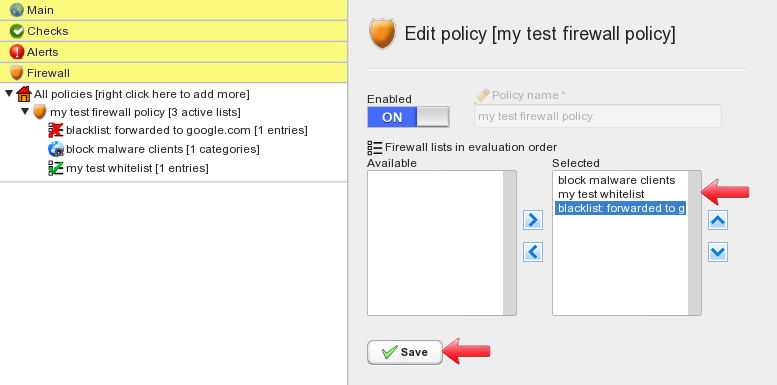
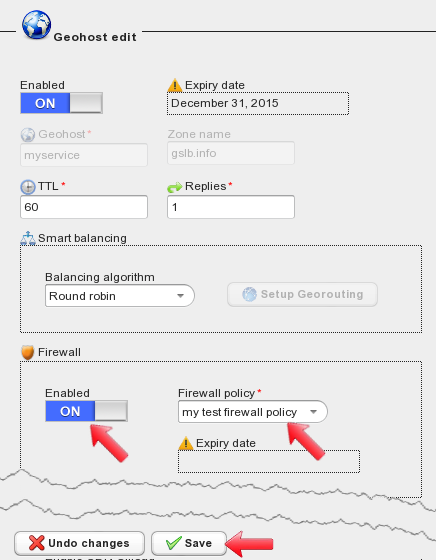
Firewall policy configuration is now complete. We need to associate the policy to our geohost in order to protect it based on the rules we just defined. To do so, open the “main” panel and left-click on the geohost name. This displays the geohost configuration panel, where the “Firewall” section can be found.
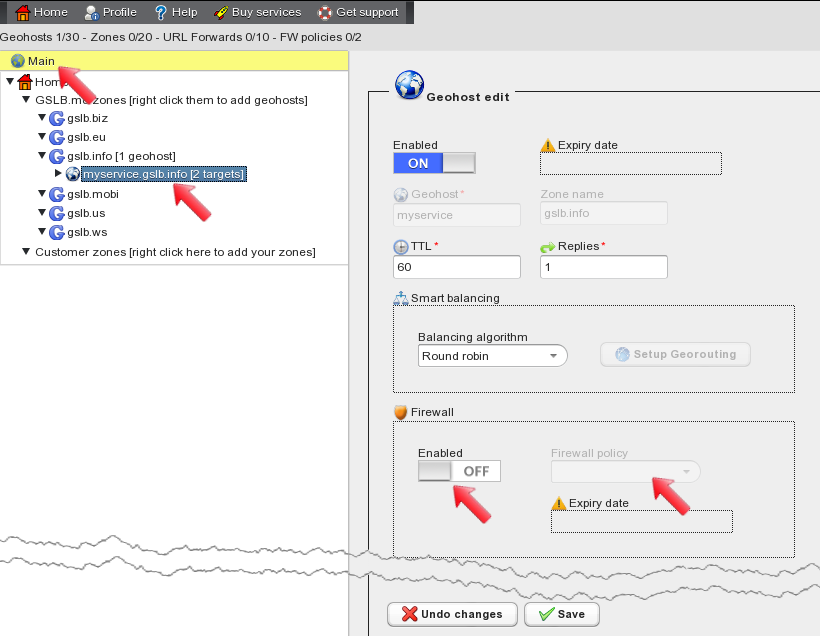
In the “Firewall” section set “Enabled” to “on” and then select the firewall policy from the dropdown menu. This applies the firewall policy to the geohost. When done, click the “Save” button.
On the left side of the screen, the geohost is marked by a “shield” icon. This means that a firewall policy is in place and will be used to check all DNS requests trying to resolve the geohost. The “star” icon reminds us that geohost configuration changes still have to be committed to make them active. To commit geohost changes you can click on the “Commit” button at the top of the screen.
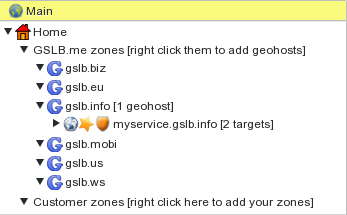
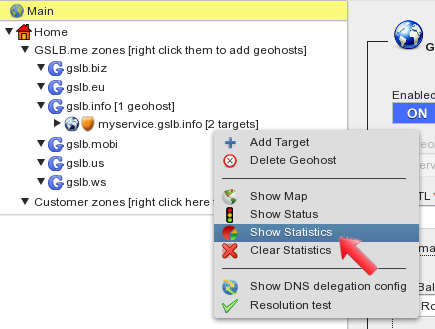
When geohost changes have been committed, the “star” icon disappears and GSLB.me starts running the firewall policy for the geohost. Realtime firewall statistics are available and can be accessed by right-clicking the geohost name and by selecting “Show Statistics” from the menu.
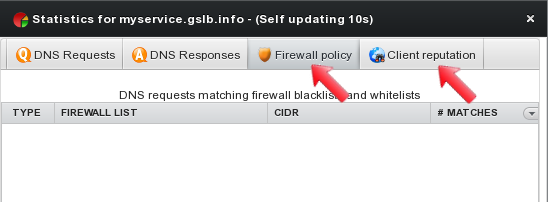
Realtime statistics include two sections related to firewall policy activity, to keep track of blocked and allowed clients.
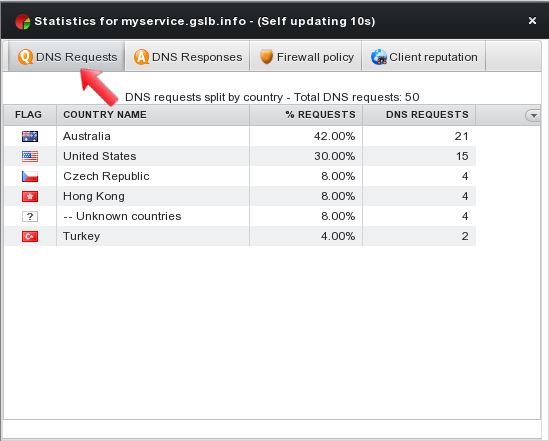
 The first tab “DNS Requests” details all DNS requests for the current geohost, providing an overview on source countries.
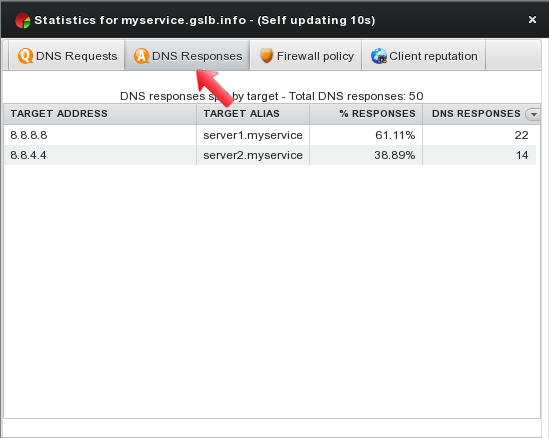
The second tab “DNS Responses” keeps track on the number of responses and their content.
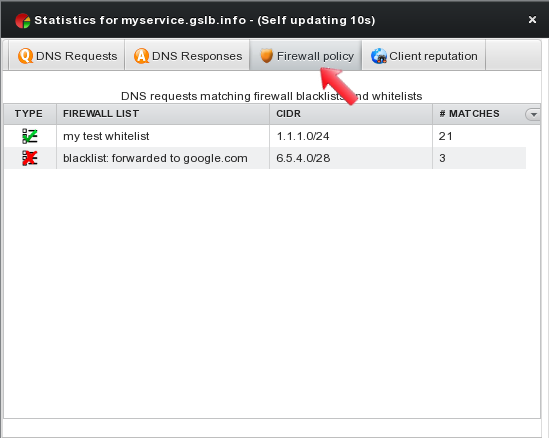
The third tab “Firewall policy” shows all blacklists and whitelists matches: list names are displayed together with matching IPs/subnets and the number of matches.
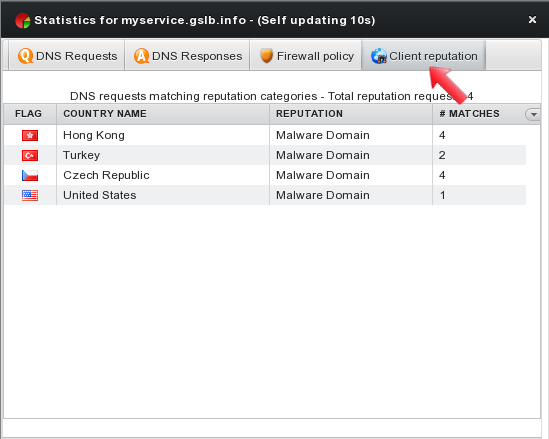
The fourth tab “Client reputation” summarizes statistics on DNS requests coming from unclean/dangerous clients showing information on source countries, reputation categories and number of matches.
DNS Firewall configuration is complete. Read our other howtos and contact us for any support request.

